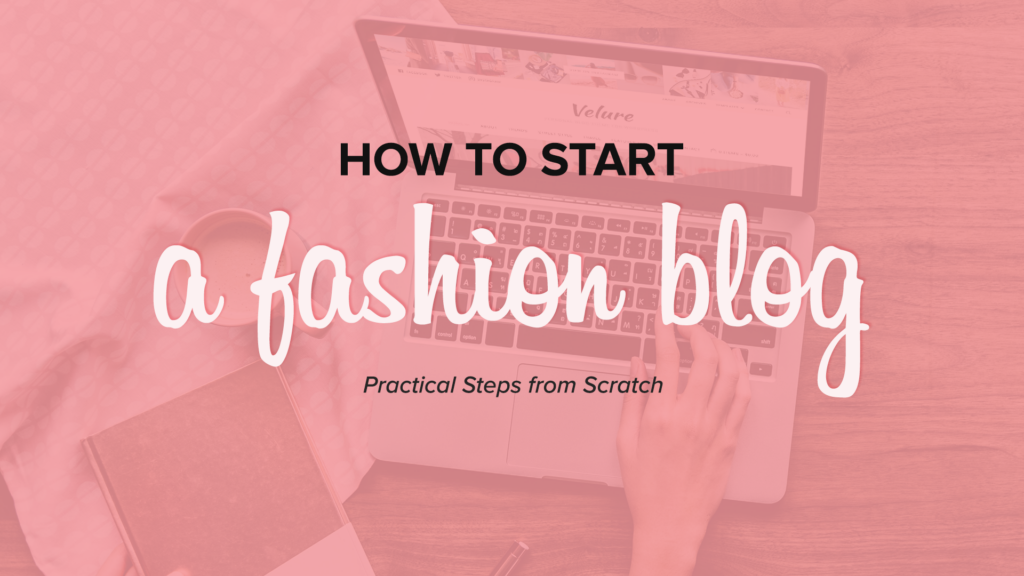
In this post, you’ll learn everything you need to start a fashion blog. I’ll walk you through every step and you don’t need any previous experience or knowledge of code :)
We’ll start with getting online, including choosing a website name, setting up hosting, and installing WordPress – the “content management system” favored by most top bloggers.
Then, you’ll learn how to create a stunning website design by choosing and installing a fashion blog WordPress theme. Next, you’ll add content to your site.
Lastly, you’ll learn how to customize your new fashion blog to your exact needs, with different colors, fonts, functionality, and social media integration. You can even connect an online shop for free! From there, you’ll be perfectly positioned to start a fashion blog from scratch – and to do it well.
Before we dive in though, let’s take a quick look at why WordPress is the best choice when you want to start a fashion blog.
Why use WordPress to start a fashion blog?
WordPress is the way to go when you want to grow your brand and make a business out of your fashion blog. WordPress itself is free and open source software. However, you do need to pay for somewhere to store your website (hosting), as well as for your website name (known as a domain name), and any premium themes you use.
When you follow along with this guide, you’ll learn how to start a fashion blog for around $150/year, making WordPress an incredibly affordable choice.
With endless customization options, you can build the fashion blog of your dreams, then modify it any time you feel like it.
But why not use an entirely free all-in-one service, such as Tumblr or Blogger? When you use WordPress, you self-host your content. This means you don’t end up giving away rights to your photos, images, blog posts, videos, or anything else you share on your website. Plus, you can be sure your hard work won’t be lost if a service decides to change their terms or even close down (much like Photobucket and Flickr did).
WordPress also gives you complete control over how your website looks and functions. With endless customization options, you can build the fashion blog of your dreams, then modify it any time you feel like it.

A real life fashion blog, Marshmallow, created using the WPZOOM theme Monte.
One of the biggest advantages of WordPress for bloggers is how easy it is to monetize your site. Whether you choose to do so from the start, or later once you’re more established, you can monetize your blog in a variety of ways. For example, you can add advertisements and/or sell products directly from your site.
We’ll look at monetization in a bit more detail later in this guide, but first things first: let’s get your fashion blog up and running.
How to get your fashion blog online
As mentioned above, WordPress is self-hosted, but what exactly does that mean? When you self-host a website, you are responsible for finding somewhere to store all your website files. You also need to link all those files up to a domain name (e.g. our domain name is wpzoom.com), so people can view your website online.
At first, setting all this up might sound tricky. But don’t worry: it’s actually very simple to do.
Once your website is set up with appropriate hosting, people will be able to type your domain name into their browser and view your website.
At first, setting all this up might sound tricky. But don’t worry: it’s actually very simple to do. There are now lots of companies who specialize in hosting WordPress websites, and they take care of all the technical parts for you. In this section, we’ll show you just how easy it is, starting with choosing a name for your blog.
Step 1: Choose a name for your fashion blog
By now, you’ve probably had some thoughts about what you’d like to call your fashion blog. If not, now is the time to start brainstorming. You’ll also need to choose a domain name for your website – the address people type into a browser to access your blog. Our brand is WPZOOM and our domain name is wpzoom.com.
It’s worth putting the time into choosing your ideal domain name before you start a fashion blog.
Your domain name should ideally include the name of your fashion blog. You need it to be easy for people to use, so it should be short, memorable, and preferably contain only letters (no hyphens). It’s best to stick with a .com extension, rather than any other variation, as this is by far the most recognized extension worldwide.
Your domain name must also be unique…so don’t get too attached to a particular name just yet. Use the tool NameMesh to check if your favorite domain is available, and find variations if it’s not.

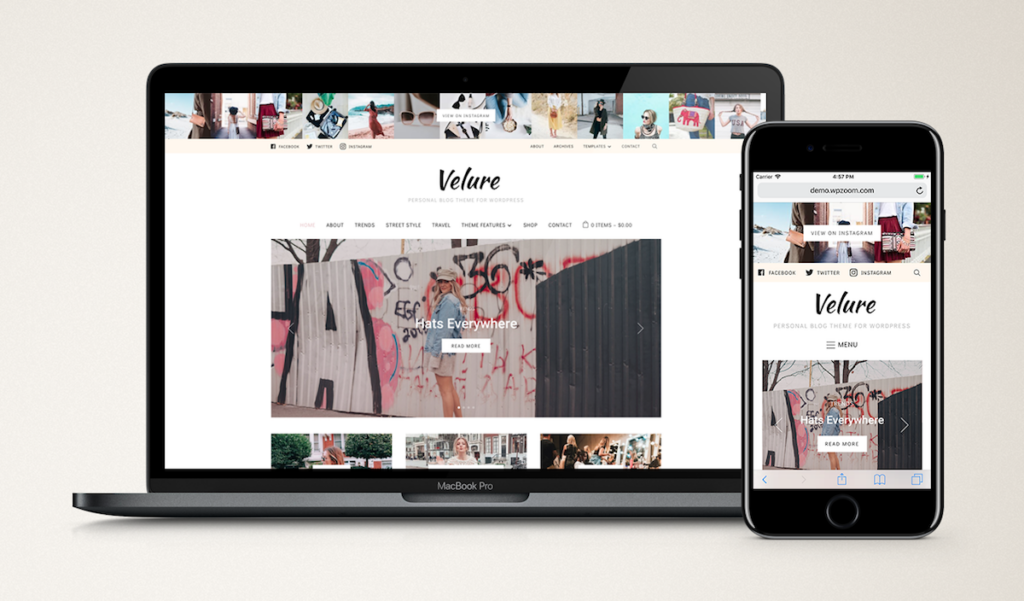
The Velure theme makes it easy to get a beautifully branded fashion blog.
It’s worth putting the time into choosing your ideal domain name before you start a fashion blog. Your blog name and domain name are an integral part of your branding, so taking time to choose something that stands out from the crowd will pay off in future. A good way to help settle on a domain name is to ask a friend to type it into their browser. If they struggle to spell it, or type the wrong thing, then it might be worth reconsidering.
Shortly, I’ll show you how to register your ideal domain name. In the meantime, it’s time to choose a place to host your website.
Step 2: Choose WordPress hosting
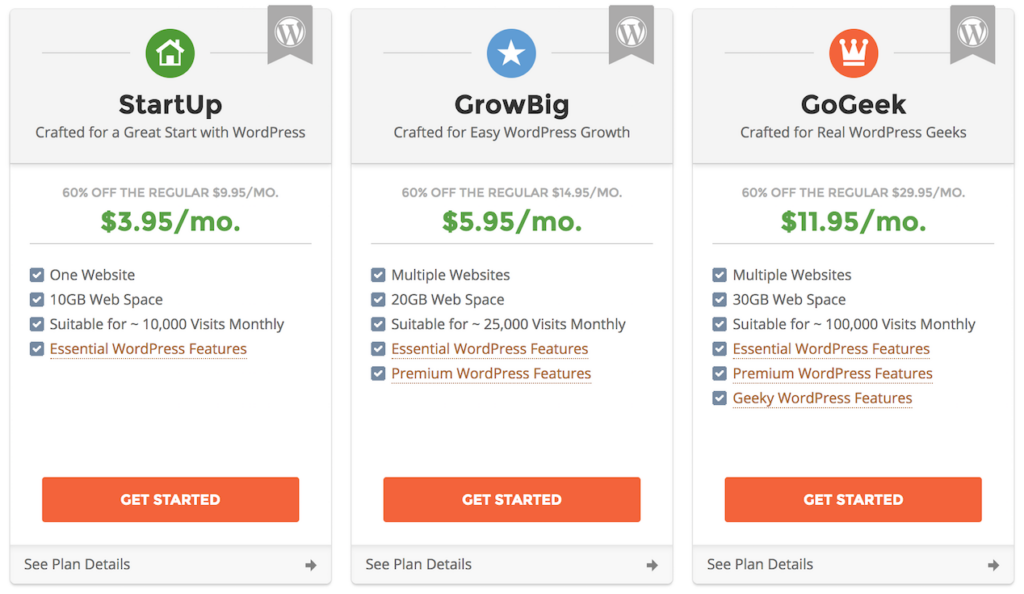
There are lots of WordPress hosts to choose from, but to make the choice easier for you, we recommend opting for our favorite hosts, SiteGround. They offer a premium service usually only offered by expensive hosts, but at a fraction of the price.
Even better, right now you can get 60% off the regular price of SiteGround hosting. SiteGround currently offer three different WordPress hosting plans: StartUp ($3.95/mo), GrowBig ($5.95/mo), and GoGeek ($11.95/mo). If you’re on a tight budget, StartUp will work fine. By opting for GrowBig though, you can get double the storage space, faster speeds, and backup restore, all for a couple of extra dollars a month.
Conveniently, SiteGround also register domain names, so you can get your hosting and domain name in the same place for a great price, without any hassle. You’ll have your fashion blog online in a matter of clicks.
Read on for step-by-step instructions for signing up to SiteGround hosting, adding your new domain name, and installing WordPress.
Step 3: Get online
Now you’ve chosen a name for your blog, a domain name, and a hosting provider, it’s time to get your website online!
This is super simple using SiteGround. Head to the SiteGround website, and choose WordPress Services from the menu:

Scroll down to find the plan you want, then click Get Started:
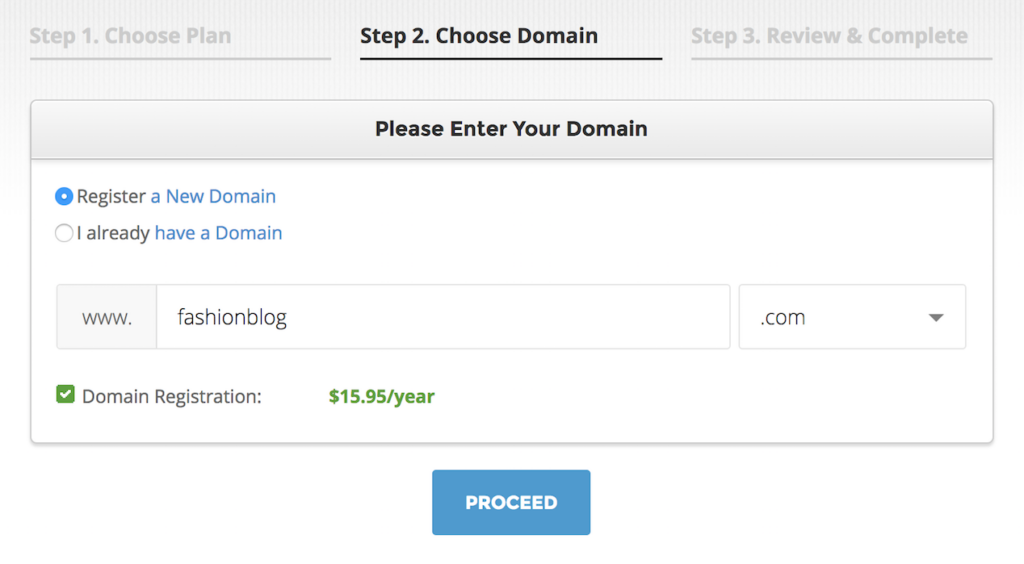
You’ll then be prompted to enter your chosen domain name. Enter the domain name you picked earlier, and click Proceed:
On the next screen you’ll be prompted to create an account and enter payment information. Once you’ve done that, scroll down and you’ll see Hosting Services and Extra Services.
Under Hosting Service it’s best to choose the data center located closest to where the majority of your website visitors will be located. This will ensure your website loads nice and fast for your target audience. You can also select the period of hosting you’d like to pay for: 1, 12, 24 or 36 months. Note there’s an extra setup fee if you opt for just one month:

Under Extra Services, the only addon we’d recommend is Domain Privacy. This keeps your personal details (including your home address) private by hiding them from the WHOIS database of website owners.
Once you’ve completed the information on this page, click Pay Now and you’re all set up with a domain name and hosting. Before getting stuck in to choosing a design for your site, the last thing you need to do is install WordPress.
Step 4: Install WordPress
Installing WordPress is super easy using SiteGround’s Website Setup Wizard. Once payment is successful, click the button: Proceed To Customer Area. Then click the big button Set up in 2 min!.
This will take you through to the Setup Wizard. You’ll see the default option selected: Get WordPress preinstalled on this account, so go ahead and click Proceed.
On the next screen you can choose your login details. These are the login details you’ll need each time you log in to your WordPress website itself. Enter an email address (this will be used if you lose your password), a username, and a password. Most people simply use their first name for the username, but you can use anything you like. It won’t be public, but do note your username cannot be changed later, so pick something you’re happy sticking with. Most importantly, make sure you choose a secure password that others won’t be able to guess. Take note of your username and password as you’ll need these shortly to log in to your new website.
Ignore the section “Choose a web design template to be installed along with your WordPress theme”, as we’re going to install a much more beautiful theme shortly. Scroll down and click Submit.
SiteGround will then automatically install WordPress for you in a few seconds. Once complete, you’ll be able to visit your WordPress site by visiting the domain name you entered earlier.
At the moment, your site won’t look very interesting at all…but it will soon! Next up, I’ll show you how to login and add a theme to your fashion blog. Read on to find out how.
Log in to your new website
Now your website is online, you can log in to the WordPress admin where you can make changes to your new blog. To access the WordPress admin, simply add /wp-admin to the end of your domain name. For example, if our website domain name was fashionblog.com, we would log in to the WordPress admin by typing fashionblog.com/wp-admin into our browser.
This takes you to the WordPress admin login page. Here, enter the username and password you created earlier then click Log in. You’re now logged in to the WordPress admin, which looks something like this:

From here you’re able to customize your site design and add content to your brand new fashion blog. Let’s go ahead and create a beautiful design for our blog by adding a new theme.
Choose a fashion blog theme
There are a huge number of WordPress themes available. Searching the WordPress theme directory is one way to find themes. But with so many available, it’s difficult to find one to fit your exact requirements. Many themes also require a high-level of technical knowledge and coding to get them working and looking the way you want.
We’ve been making WordPress themes for the last decade, so know what makes a great theme. Our themes are built for people who don’t want to spend time coding, but want the advantages of creating a website suited to their unique style.
With this in mind, we recommend choosing from two of our themes, Velure or Monte, as they both come with everything you need to start a fashion blog:
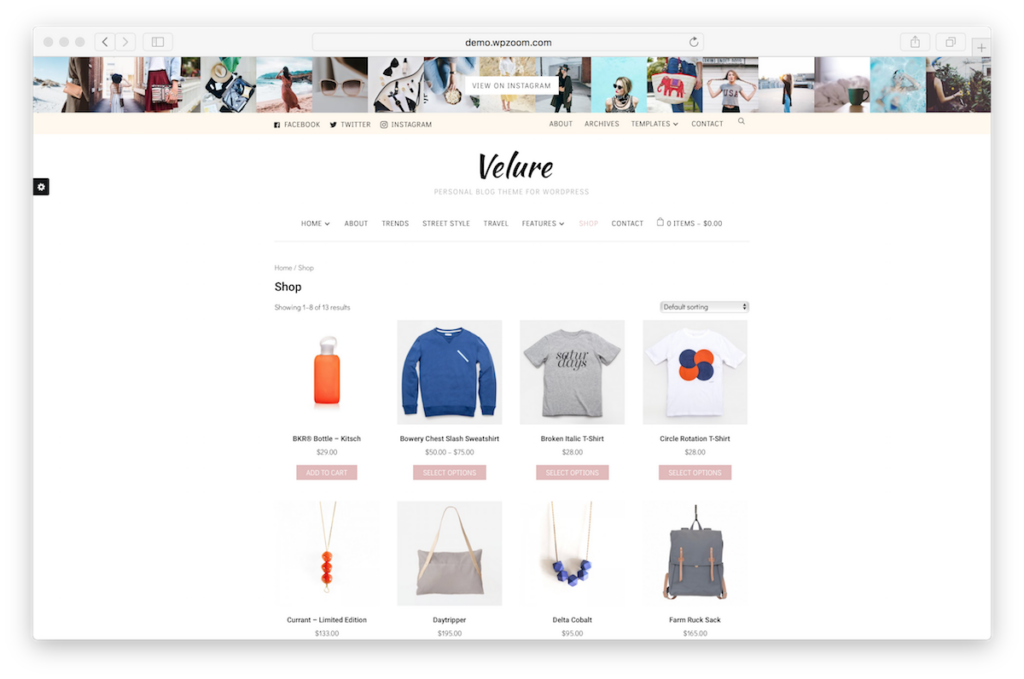
Velure fashion blog theme
Velure is a highly customizable theme, perfect for fashion bloggers. Choose from 4 pre-designed color schemes or choose any color at all using the live customizer. Personalize your site with fonts, background, a logo and menu.
You can add other features, including an Instagram bar and image box, using Widgets – and see how everything will look on your site using our live preview:

Even more, Velure integrates with the free eCommerce plugin, WooCommerce, so you can set up your very own shop and sell products directly from your fashion blog.
This theme ensures you’re set with the ideal features when you want to start a fashion blog, plus there’s plenty of opportunity to add to and modify your site later on.
Monte fashion blog theme

Monte also comes with a visual customizer, making it super simple to customize with colors and stunning typography to suit your branding. Like Velure, it’s responsive, so looks great on mobile, laptop, desktop, and tablet. It includes an Instagram widget, so you can share stunning Instagram gallery on your blog:

It too integrates with WooCommerce, so you can sell products directly from your fashion blog.
Both of these themes have all the features you need, so all you need to do is choose the one you like the look of best. Once you’ve done that, it’s time to go ahead and install your chosen theme.
Install and activate your chosen theme
First, you’ll need to buy Velure or Monte. Next, log in to the WPZOOM member area, locate your new theme, click Download and save to your computer.
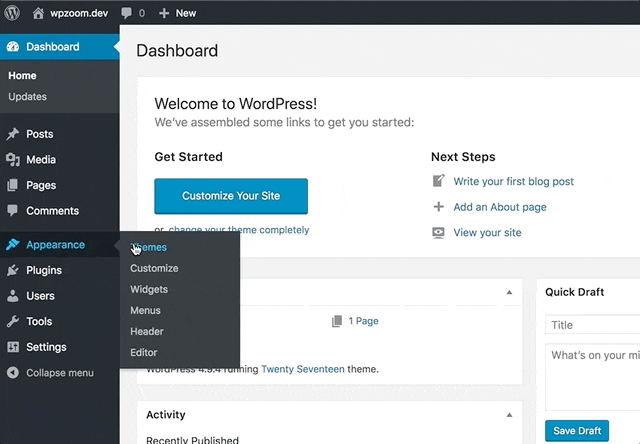
Then go to your site’s WordPress admin area (e.g. yoursite.com/wp-admin). In the sidebar, go to Appearance → Themes, click Add new and Upload Theme:
Click Choose file. Select the downloaded theme file from your computer, click Open and Install now.
This will install the theme onto your new website. Click Activate. From here you can go ahead and take the theme tour to learn more about the theme:

WordPress uses pieces of code called Plugins to add extra functionality. If you’re installing Monte for example, at the top of the window, you’ll see the theme prompting you to install one required plugin. Click Begin installing plugin, then click Install underneath the Social Icons Widget by WPZOOM.
Once installed, go to Plugins → Installed Plugins in the sidebar. Find the Social Icons Widget by WPZOOM, click Activate and you’re ready to go.
In the next sections, I’ll show you how to add content and customize your blog.
Add content to your fashion blog
Now your theme is installed, and your website is live, you can go right ahead and start adding content. To start a fashion blog that’s truly successful, you need to present your content in a user friendly, engaging way.
To make this easier, WPZOOM themes all come with demo content. You get access to a professional layout, structured specifically for fashion blogs. This saves trying to figure out how to structure your site for maximum engagement and provides the ideal starting point for adding your own unique content.
To do this, click WPZOOM in the sidebar then click Import/Export → Demo Content:

Click the button Load Demo Content and confirm in the next window by clicking Load Demo Content.
In just a few moments, the demo content will be loaded onto your site. Then, all you need to do is follow the cues to finish setting up the demo content:

Now you have a great base for your fashion blog. Check it out by clicking View your website.
The time has come to get creative and start adding your own content. To add new Pages, such as a home page, about page, and contact page: head to Pages → Add New.
To add new blog posts: in the WordPress admin, head to Posts → Add New.
Each page and post is a new opportunity to get creative. Add your own photos, words, videos and/or GIFs then hit Publish!
You can also customize lots of other visual aspects of your site. Let’s do that now.
Customize your fashion blog
There are all sorts of customization options available to make your fashion blog your own. Go ahead and dive into the Customizer (found in Appearance → Customize).
Some of the customization options include:
- Site title and tagline
- Typography
- Website colors
- Menus
- Footer
You can also add Widgets to your site by heading to Appearance → Widgets. Widgets can add all sorts of special visual features to your site. For example, Monte includes social icons, an author bio, and a carousel slider. Just drag and drop these into whatever position you’d like:

You can then play around with the locations of your Widgets in the Customizer.
Get creative and customize away. Remember, all our themes come with tons of documentation and our Support Team is on hand to help should you need any assistance.
You’re all set up. So, what’s next?
Your site’s live and looking brilliant. But are you already thinking about growing and monetizing your new blog? Awesome! WordPress is perfect for this because it gives you the power to control your SEO, monitor analytics and boost your audience.
It’s a good idea to add an SEO plugin to your website, such as Yoast SEO, as this will help boost your visibility in search. You should also connect Google Analytics to your site so you can monitor your website traffic. This will help you keep track of the vital statistics needed to secure advertisers and affiliates in future.
And don’t forget both Velure and Monte are compatible with WooCommerce. You can download the WooCommerce plugin for free anytime and start your very own shop.
Monetize your fashion blog by adding a WooCommerce store.
The point is: your options for growth are endless!
Start a fashion blog in no time
We hope this guide has given you a solid foundation to start a fashion blog you’ve always wanted. As you can see, it’s really very quick and easy to do. To recap, in this guide we covered:
- How to get your blog online, including choosing a domain name, purchasing hosting, and installing WordPress
- Logging in to the WordPress admin to make changes to your site
- Choosing and installing a fashion blog theme
- Adding content to your website
- Customizing your fashion blog
- Tips to help you grow and monetize your blog

Here are all those useful links and resources again for easy access:
- SiteGround for WordPress hosting.
- NameMesh for checking the availability of your domain name.
- WordPress theme directory if you want to search for themes.
- Velure and Monte are the ideal themes to start a fashion blog.
- Yoast SEO to help boost search visibility.
- WooCommerce for connecting a store to your blog.
Congratulations on launching your beautiful new fashion blog :) Running a blog is of course a lot of hard work. And I’m sure you know when you start a fashion blog, that’s just the beginning. But it’s also so much fun! Good luck and don’t hesitate to ask any questions or share your new fashion blog in the comments below.