Adding JavaScript to WordPress enhances your site with dynamic functionality that standard features can’t provide. While WordPress doesn’t allow direct JavaScript insertion in the content editor, several effective implementation methods exist.
This guide walks you through multiple approaches, from beginner-friendly plugins to advanced code integration techniques. You’ll learn practical steps for adding JavaScript to specific pages, posts, or your entire site while maintaining performance and security standards.
Table of Contents
- Before You Begin: Important Considerations
- Method 1: Using Plugins to Add JavaScript to WordPress
- Method 2: Adding JavaScript Manually to Theme Files
- Method 3: Using WordPress Hooks and Functions.php
- Targeting Specific Pages or Posts with JavaScript
- Optimizing JavaScript Performance in WordPress
- Debugging JavaScript in WordPress
Before You Begin: Important Considerations
Taking precautions before adding JavaScript to your WordPress site can save you time and frustration later.
- First, create a complete backup of your website files and database. This ensures you can restore everything if something goes wrong during implementation.
- When adding JavaScript directly to theme files, always use a child theme instead of modifying the parent theme directly. For guidance, check out our complete tutorial on creating a WordPress child theme.
- JavaScript affects page loading speed, so performance should be considered when adding scripts. Wherever possible, place non-essential code in the footer rather than the header.
- Test your changes in a staging environment before applying them to your live site. Many hosting providers offer staging tools that create a private copy of your website for testing.
- Finally, only use JavaScript from trusted sources to maintain your site’s security and stability.
Method 1: Using Plugins to Add JavaScript to WordPress
Plugins offer the most straightforward approach to adding JavaScript to WordPress for beginners and those uncomfortable with code editing. They provide user-friendly interfaces while handling the technical aspects behind the scenes.
Several excellent options exist for managing JavaScript in WordPress:
- WPCode: This popular plugin lets you add code snippets to your site’s header, body, or footer without editing theme files, with additional features for conditional loading.
- Simple Custom CSS and JS: This tool focuses on adding custom CSS and JavaScript to WordPress sites with options for internal or external file loading.
- Code Snippets: A versatile plugin for adding various code types, including JavaScript, to your WordPress site with snippet organization and export/import capabilities.
- Head & Footer Code: A lightweight, no-frills option for users who need just the basic functionality of adding scripts to head and footer locations.
- Insert Headers And Footers: Perfect for absolute beginners with its minimalist interface and helpful inline documentation to guide first-time users.
Adding JavaScript with WPCode: Step-by-Step
Let’s walk through the process using WPCode as an example:
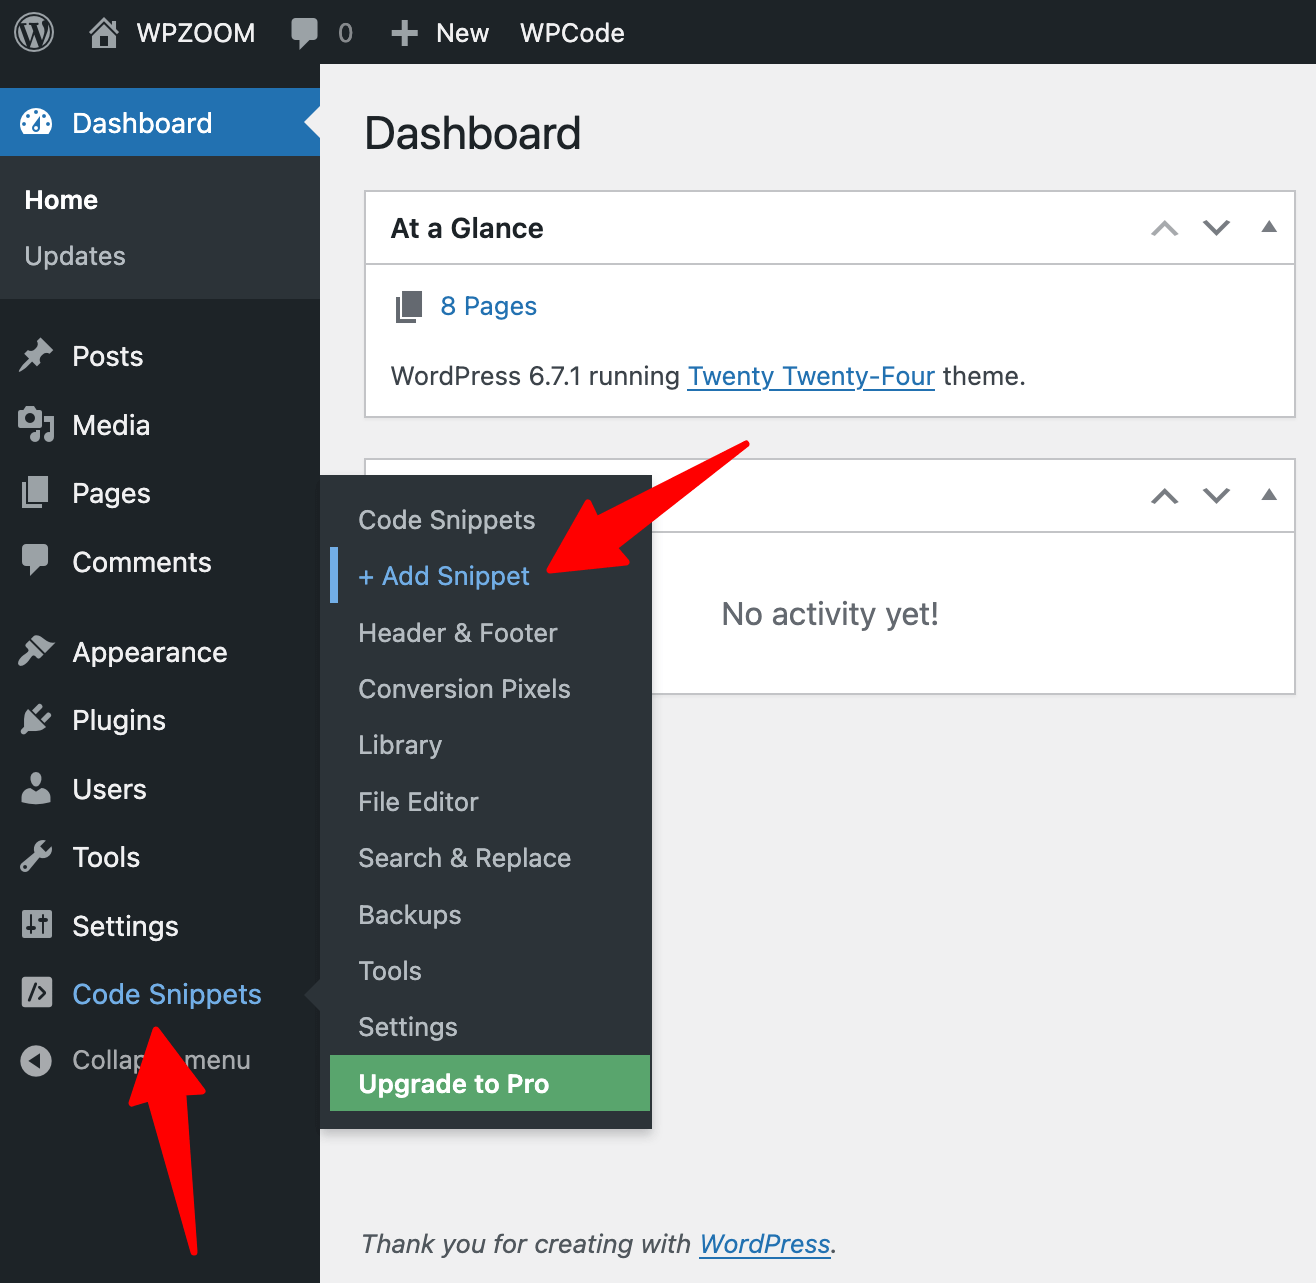
1. Install and activate the WPCode plugin through your WordPress dashboard.
Plugins > Add New > search for “WPCode“.

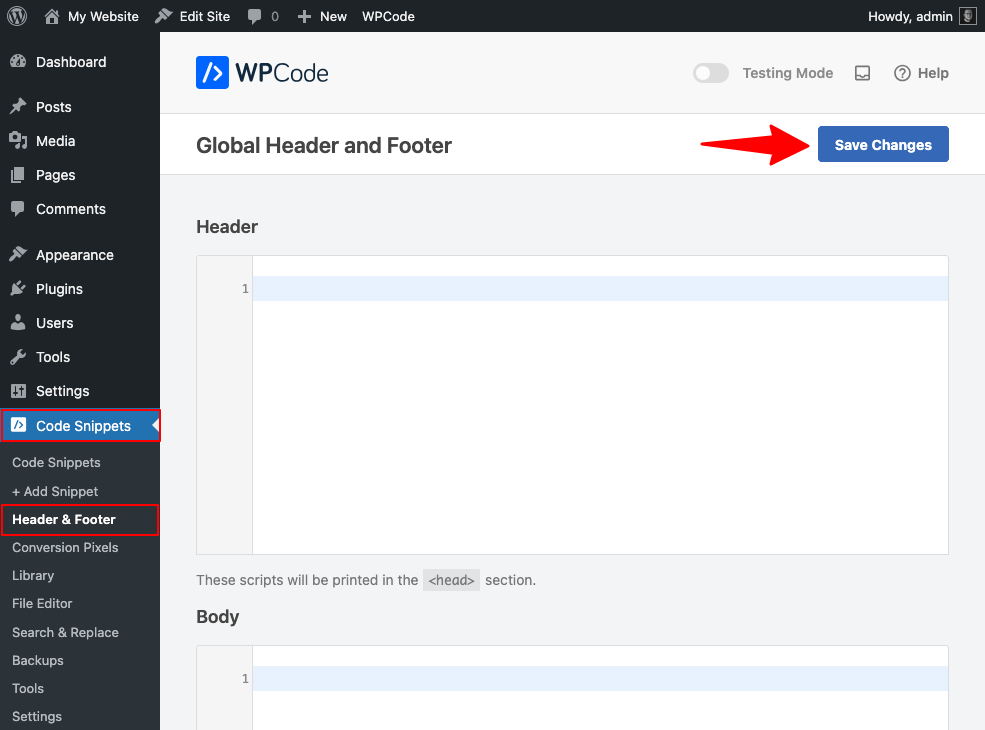
2. After activation, navigate to Code Snippets > Headers & Footers in your dashboard.
3. Choose where to add your JavaScript:
- Header: Scripts load before page content (good for analytics or required libraries)
- Body: Scripts load while the page renders
- Footer: Scripts load after page content (best for most functionality).
4. Paste your JavaScript code into the appropriate section, making sure to include proper <script> tags.
5. Click “Save Changes” to implement your JavaScript across your site.
Adding JavaScript to Specific Pages or Posts with WPCode
To add JavaScript to specific pages or posts, use the Snippets feature instead:
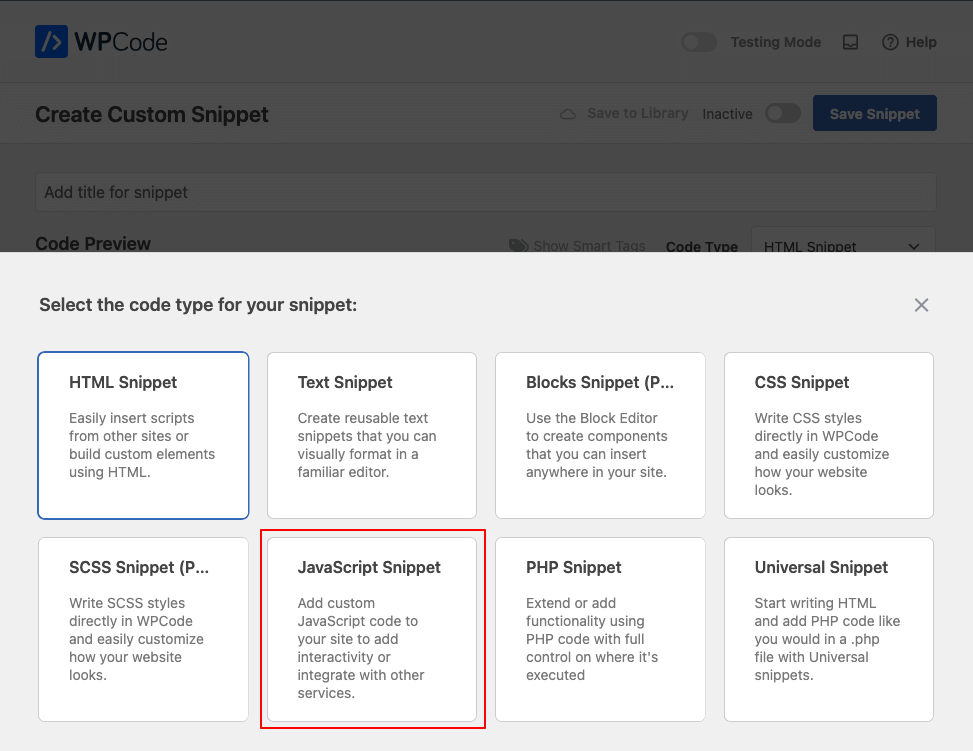
1. Go to Code Snippets > + Add Snippet.
2. Choose “Add Your Custom Code (New Snippet)” as the snippet type.

3. Select “JavaScript Snippet” as the code type for your snippet.
4. Name your snippet and add your JavaScript.
5. Under “Location,” select where the snippet should appear.
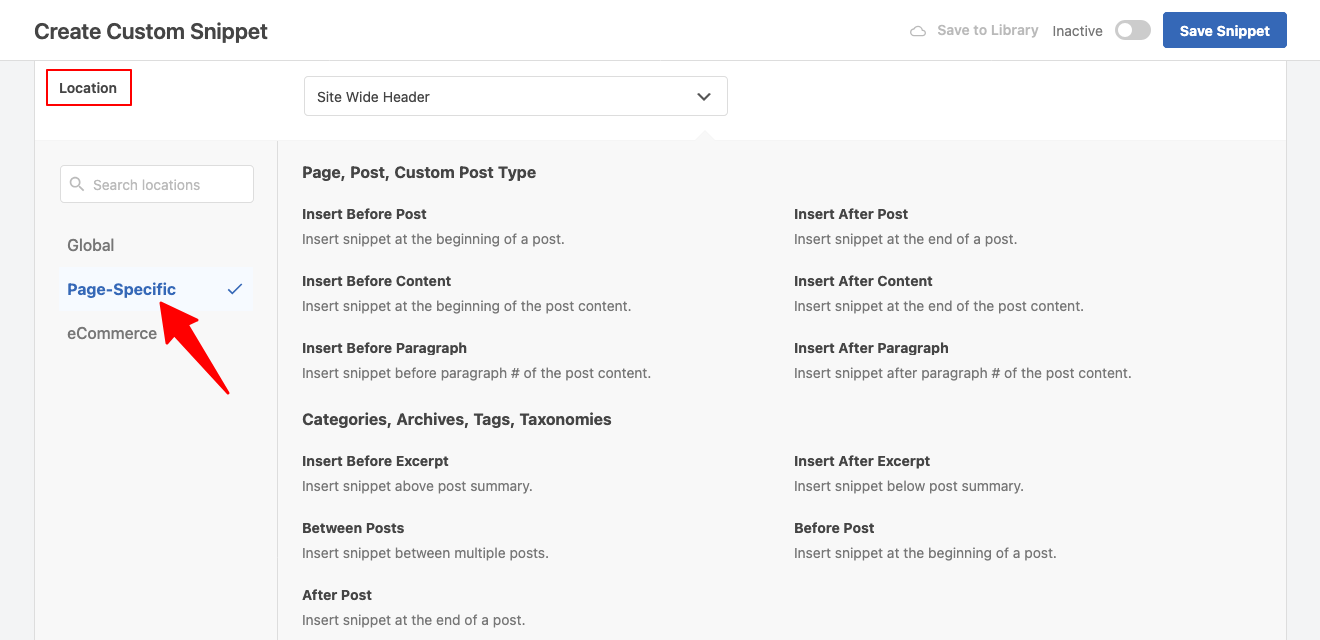
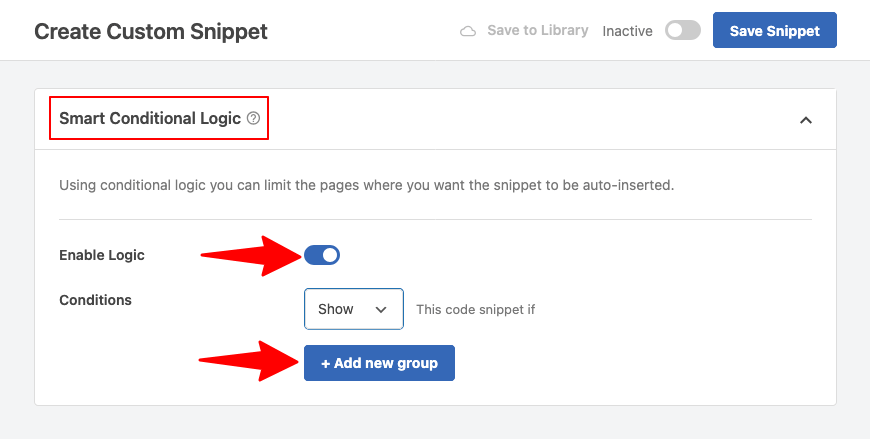
6. Scroll down to “Smart Conditional Logic“, turn no “Enable Logic” and click “+ Add new group“.
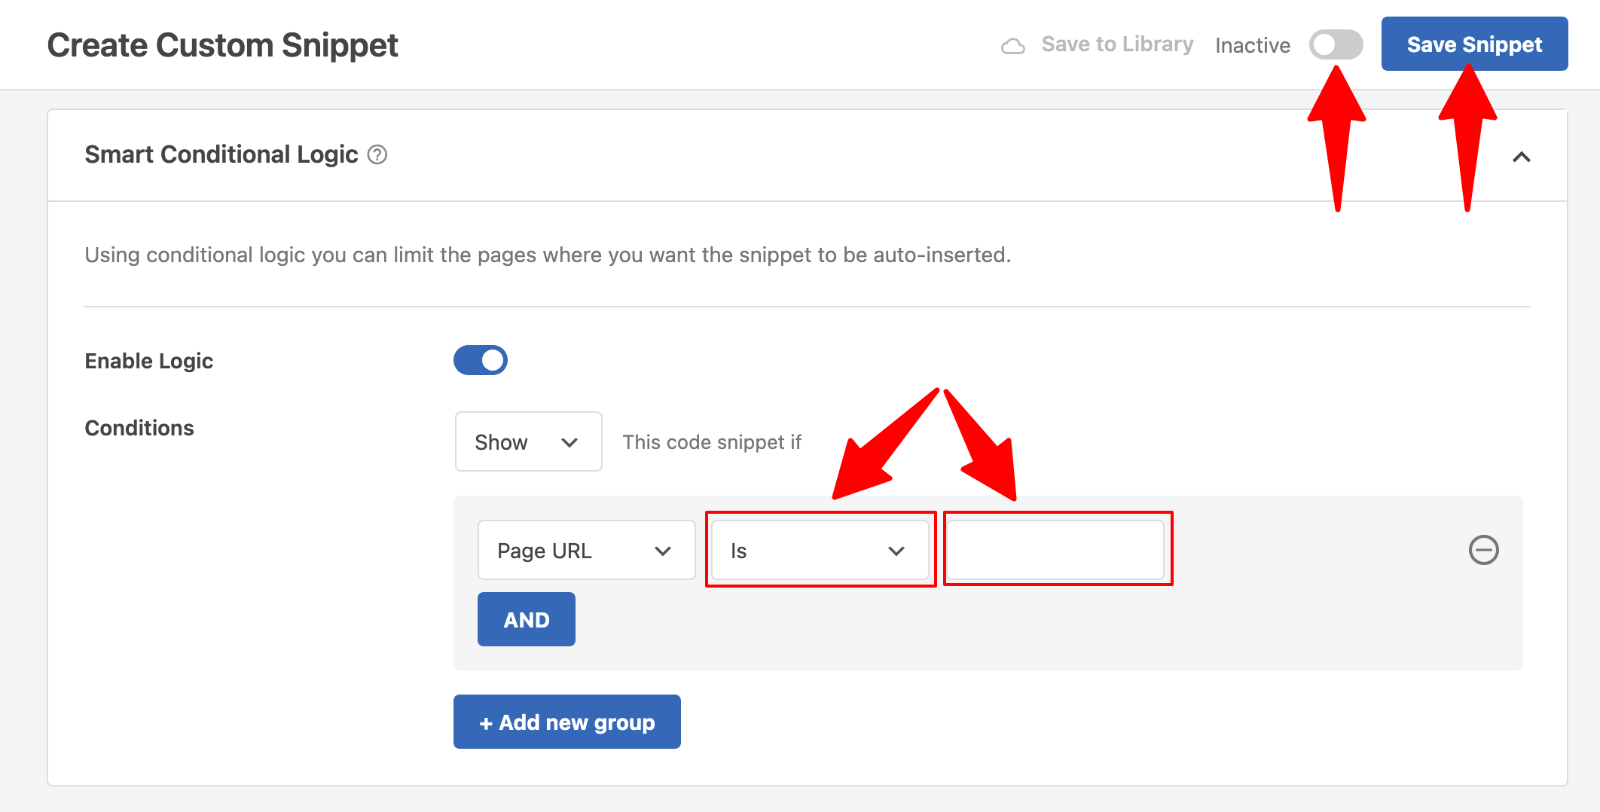
7. Type on “Logged-in” drop-down menu, navigate to “Where (page)” and choose “Page URL” or another condition.

8. Choose “Is” and enter the page slug at the right of the “Page URL” drop-down menu.
Click “Save Snippet” and turn on the “Inactive/Active” toggle to activate the snippet.
Upgrade Your Website with a Premium WordPress Theme
Find a theme that you love and get a 20% discount at checkout with the FLASH20 code
Choose your theme
Method 2: Adding JavaScript Manually to Theme Files
For developers or those comfortable with code, manually adding JavaScript to theme files offers greater control and flexibility. This approach lets you place code exactly where you need it within your site’s structure.
Consider this approach when:
- You need precise placement of scripts
- Your JavaScript requires integration with specific theme elements
- You’re developing a custom theme or plugin
- You prefer direct file access over plugin interfaces
Understanding WordPress Theme Structure
WordPress themes contain several key files relevant to JavaScript implementation:
- header.php: Controls content in the <head> section and beginning of the body
- footer.php: Contains closing HTML tags and footer content
- functions.php: Defines theme functionality and handles proper script loading
These files serve distinct purposes when adding JavaScript to your site.
Adding JavaScript to the Header
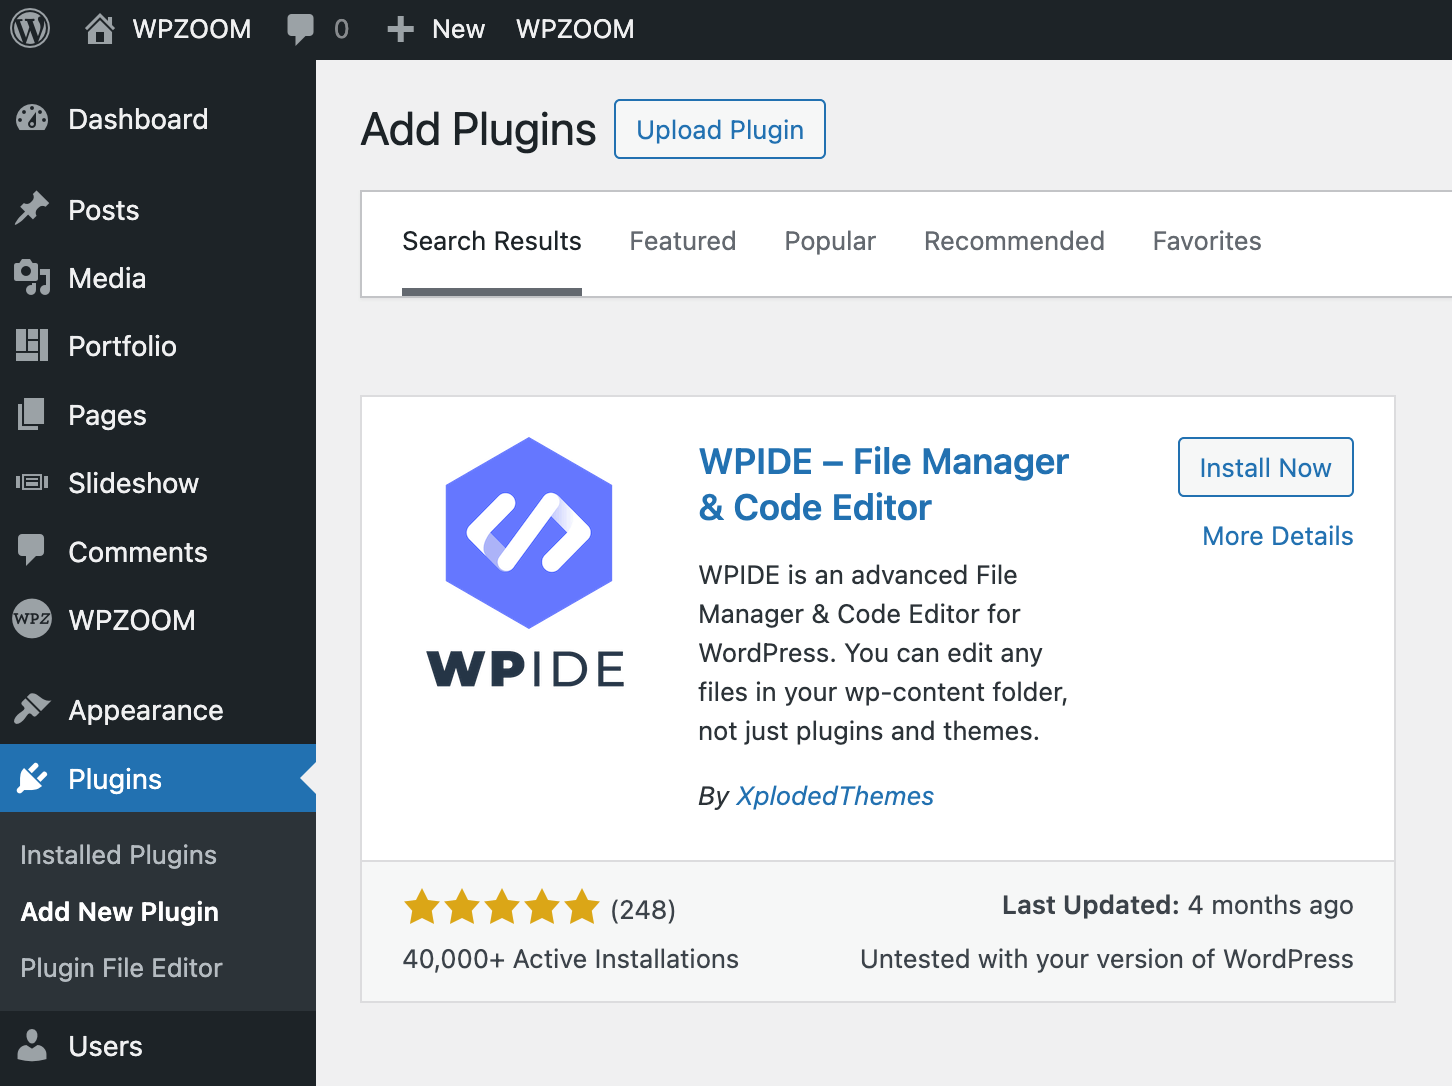
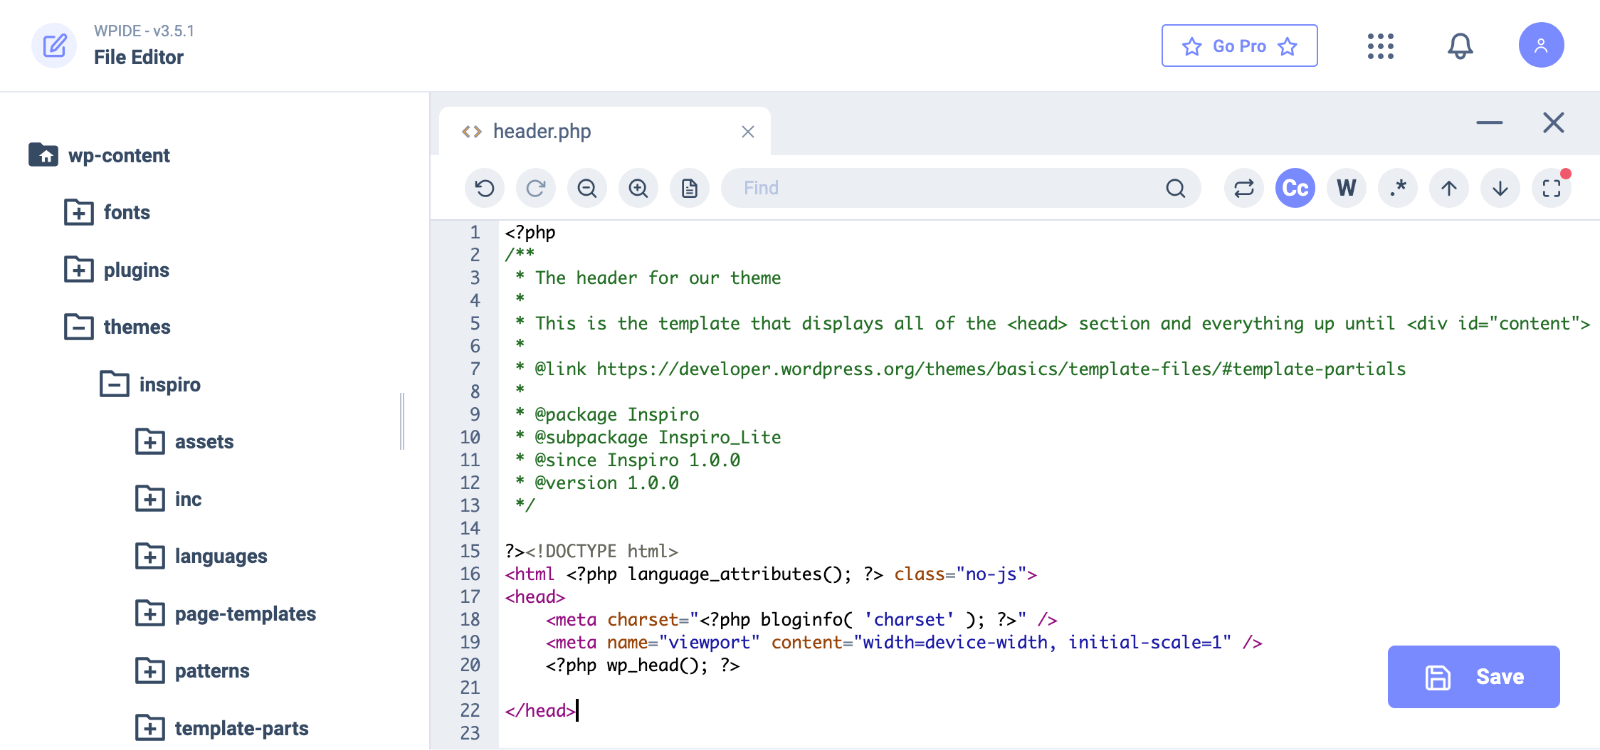
To place JavaScript in your site’s header, access your theme’s header.php file using the WPIDE plugin, WordPress Theme Editor or an FTP/File Manager.
1. For a better code editing experience, we’ll use the WPIDE plugin. Install and active it.
2. Go to WPIDE > File Manager, navigate to themes > your theme and find and click the header.php file to start editing it.

3. Locate the closing </head> tag.
4. Insert your JavaScript code before this tag using proper <script> tags.
5. Save the file.
This placement loads scripts early during page rendering, making them available throughout the page. However, scripts in the header may delay content display while loading.
Adding JavaScript to the Footer
For better performance, place non-essential scripts in the footer:
- Access footer.php through WPIDE, the editor, or FTP.
- Find the closing </body> tag.
- Insert your JavaScript code before this tag.
- Save changes.
Footer placement allows content to load first, improving perceived page speed while still allowing scripts to be used for page functionality.
Creating a Dedicated JavaScript File
For a cleaner organization, especially with larger scripts:
- Create a .js file containing your JavaScript code (without <script> tags).
- Save it in your theme’s js folder (create one if needed).
- Open functions.php.
- Add code to properly load your JavaScript file:
function custom_theme_scripts() {
    wp_enqueue_script('custom-script', get_template_directory_uri() . '/js/custom-script.js', array(), '1.0.0', true);
}
add_action('wp_enqueue_scripts', 'custom_theme_scripts');
This method keeps your JavaScript separate from HTML/PHP files, making it easier to maintain and update.
Common Pitfalls to Avoid
Watch out for these issues when manually adding JavaScript:
- Missing closing tags or syntax errors that break your site
- Loading scripts in incorrect order (dependencies must load first)
- Duplicate jQuery loading (WordPress includes jQuery)
- Forgetting to update the file path if your directory structure changes
Regular testing helps catch these problems before they affect visitors.
Method 3: Using WordPress Hooks and Functions.php
WordPress hooks provide a powerful way to insert JavaScript at specific points during page generation without directly editing theme template files. This method offers flexibility while maintaining compatibility with theme updates.
Understanding WordPress Hooks
Hooks are connection points where you can attach custom code to WordPress processes. The two main types apply to JavaScript integration:
- Action hooks: Allow you to add code at specific points during page loading
- Filter hooks: Enable modification of content before it displays
For JavaScript, the most relevant action hooks include:
- wp_head: Fires within the <head> section
- wp_footer: Executes just before the closing </body> tag
- wp_enqueue_scripts: The proper hook for registering and loading scripts
The Power of wp_enqueue_script
WordPress provides wp_enqueue_script() as the recommended function for adding JavaScript. This function:
- Manages script dependencies
- Prevents duplicate loading
- Handles proper script ordering
- Offers options for placement and loading behavior
Here’s how to implement it:
- Open your child theme’s functions.php file
- Add a custom function that uses wp_enqueue_script
- Hook this function to the wp_enqueue_scripts action
Loading External JavaScript Files
To add an external JavaScript file:
function theme_custom_scripts() {
    wp_enqueue_script('custom-js', get_template_directory_uri() . '/js/custom.js', array('jquery'), '1.0', true);
}
add_action('wp_enqueue_scripts', 'theme_custom_scripts');
Let’s break down this code:
- ‘custom-js’: A unique handle to identify this script
- get_template_directory_uri() . ‘/js/custom.js’: Path to your JavaScript file
- array(‘jquery’): Dependencies (jQuery in this case)
- ‘1.0’: Version number for cache management
- true: Load in footer (false loads in header)
Adding Inline JavaScript
For smaller JavaScript snippets:
function add_inline_js() {
    ?>
    <script type="text/javascript">
        // Your JavaScript code here
        document.addEventListener('DOMContentLoaded', function() {
            // Code that runs after page loads
        });
    </script>
    <?php
}
add_action('wp_footer', 'add_inline_js');
This approach embeds the JavaScript directly within your page’s HTML rather than loading an external file.
Managing jQuery Dependencies
WordPress includes jQuery by default, but it runs in “noConflict” mode. When writing jQuery-dependent code:
function jquery_custom_script() {
    wp_enqueue_script('custom-jquery', get_template_directory_uri() . '/js/custom-jquery.js', array('jquery'), '1.0', true);
}
add_action('wp_enqueue_scripts', 'jquery_custom_script');
In your .js file, use:
jQuery(document).ready(function($) {
    // Use $ as normal here
    $('#element').addClass('active');
});
This ensures compatibility with other JavaScript libraries that might use the $ symbol.
Upgrade Your Website with a Premium WordPress Theme
Find a theme that you love and get a 20% discount at checkout with the FLASH20 code
Choose your theme
Targeting Specific Pages or Posts with JavaScript
Sometimes you need JavaScript to run only on specific pages rather than across your entire site. WordPress offers several methods for this targeted approach.
Using Conditional Logic
WordPress provides built-in conditional functions to check what type of content is being displayed:
- is_page(): Checks if viewing a specific page
- is_single(): Checks if viewing a particular post
- is_category(): Checks if viewing a category archive
- is_home(): Checks if viewing the blog posts page
- is_archive(): Checks if viewing any archive page
Adding JavaScript to Specific Pages
To add JavaScript to a particular page, modify your functions.php code:
function page_specific_script() {
    if(is_page('contact') || is_page(42)) {
        wp_enqueue_script('contact-form-validation', get_template_directory_uri() . '/js/validation.js', array('jquery'), '1.0', true);
    }
}
add_action('wp_enqueue_scripts', 'page_specific_script');
This code loads the script only on pages with the slug ‘contact’ or the page with ID 42.
Adding JavaScript to Specific Posts
Similarly, target specific posts:
function post_specific_script() {
    if(is_single('product-review') || is_single(157)) {
        wp_enqueue_script('review-features', get_template_directory_uri() . '/js/review.js', array(), '1.0', true);
    }
}
add_action('wp_enqueue_scripts', 'post_specific_script');
Targeting Custom Post Types or Categories
For more complex targeting:
function custom_content_script() {
    if(is_singular('product') || is_category('featured')) {
        wp_enqueue_script('product-script', get_template_directory_uri() . '/js/product.js', array(), '1.0', true);
    }
}
add_action('wp_enqueue_scripts', 'custom_content_script');
Using Shortcodes for JavaScript
Shortcodes offer another way to insert JavaScript into specific content:
function js_shortcode_function() {
    $output = '<script type="text/javascript">';
    $output .= 'alert("This message appears only where the shortcode is used!");';
    $output .= '</script>';
    return $output;
}
add_shortcode('js_alert', 'js_shortcode_function');
With this registered, insert [js_alert] anywhere in post or page content to trigger that specific JavaScript.
This targeted approach prevents unnecessary script loading, improving site performance while maintaining needed functionality where required.
Optimizing JavaScript Performance in WordPress
JavaScript improves your website’s functionality, but can slow down page loading if not appropriately handled. Optimizing how you implement JavaScript maintains performance while retaining all its benefits.
Follow these techniques to maximize speed and efficiency:
Minification and Compression
Minifying JavaScript removes unnecessary characters like whitespace, comments, and line breaks without changing functionality. This reduces file size and speeds up loading times.
Several tools can help with minification:
- Online minifiers like JSCompress
- WordPress plugins such as WP Rocket
- Build tools like Webpack or Gulp for development workflows
Defer and Async Loading
The way scripts load affects how quickly users see your content:
- Defer: Loads scripts after HTML parsing completes but before DOMContentLoaded fires
- Async: Loads scripts alongside HTML parsing, executing as soon as downloaded
Add these attributes when enqueuing scripts:
function optimized_script_loading() {
    wp_enqueue_script('deferred-script', get_template_directory_uri() . '/js/script.js', array(), '1.0', true);
    wp_script_add_data('deferred-script', 'defer', true);
}
add_action('wp_enqueue_scripts', 'optimized_script_loading');
Strategic Script Placement
Where you place scripts matters:
- Header scripts block content rendering until they load
- Footer scripts allow content to display first
- Only place scripts in the header when absolutely necessary
Combining Multiple Scripts
Reducing HTTP requests improves loading times. When possible, combine multiple JavaScript files into a single file, especially for related functionality.
Handling Third-Party Scripts
External scripts from analytics, advertising, or social media platforms can significantly impact performance:
- Load non-essential third-party scripts in the footer
- Consider lazy loading options that delay loading until needed
- Use tag management systems to control third-party code
- Regularly audit third-party scripts to remove unused ones
Measuring JavaScript Performance
Track how JavaScript affects your site:
- Use browser developer tools to monitor loading times
- Check PageSpeed Insights for specific recommendations
- Monitor Core Web Vitals metrics like First Input Delay
- Test your site regularly after adding new scripts
These optimization techniques help balance enhanced functionality with the fast-loading experience users expect.
Debugging JavaScript in WordPress
Even carefully implemented JavaScript can sometimes behave unexpectedly. Effective debugging helps identify and fix issues quickly.
Common JavaScript Errors in WordPress
Watch for these frequent problems:
- Syntax errors from missing brackets, semicolons, or quotes
- Conflicts between multiple JavaScript libraries
- jQuery dependency issues when $ is undefined
- DOM manipulation attempts before elements load
- Cross-browser compatibility problems
Using Browser Developer Tools
Your browser’s developer tools provide powerful debugging capabilities:
- Open developer tools with F12 or right-click and select “Inspect“
- Navigate to the Console tab to view JavaScript errors
- Check the Network tab to confirm scripts are loading
- Use breakpoints in the Sources tab to pause execution and inspect variables
These tools show where and why errors occur, making fixes much easier.
Enabling WordPress Debug Mode
WordPress includes built-in debugging features. Add these lines to your wp-config.php file:
define('WP_DEBUG', true);
define('WP_DEBUG_LOG', true);
define('SCRIPT_DEBUG', true);
This configuration reveals errors that might otherwise remain hidden and loads unminified versions of core scripts for better debugging.
Troubleshooting Techniques
When facing JavaScript issues:
- Temporarily disable other plugins to check for conflicts
- Test with a default WordPress theme to isolate theme-specific problems
- Add console.log() statements to track code execution
- Verify script dependencies load in the correct order
- Use try/catch blocks to handle potential errors gracefully
Take Your WordPress Site to the Next Level with WPZOOM
Ready to transform your WordPress site with stunning design and seamless JavaScript integration?
WPZOOM themes provide the perfect foundation for your creative vision. Our professionally crafted themes come with clean code architecture, making JavaScript implementation straightforward and reliable. You’ll appreciate our detailed documentation and dedicated support team, ready to assist with your customization needs.
Whether you’re building a portfolio, business site, or blog, WPZOOM themes offer the flexibility and performance you need.